Brightway / LEQI Scooter Tuning Guide
This guide has been created by ScooterTeam.
Table of Contents
- Quick Start Guide
- Supported Models
- Safety Warning
- Warning About Tuning Chips
- Hardware Requirements
- Flashing Instructions
- Troubleshooting
- Additional Resources
- Full Disclaimer
Quick Start Guide
- Check if your scooter model is supported (see Supported Models)
- Read the Safety Warning carefully
- Get the required hardware (see Hardware Requirements)
- Follow the step-by-step Flashing Instructions
A comprehensive video tutorial explaining every step in great detail is available on YouTube.
Supported Models
Scooter Model Compatibility
| Model | Manufacturer | Tested OK | Credits for testing |
|---|---|---|---|
| 3 Lite | Brightway | TBA | TBA |
| 4 | Brightway | ✅ | Ilkan0342567 |
| 4 Lite | Brightway | ✅ | Gianluxx |
| 4 Lite 2nd Gen | LEQI | TBA | TBA |
| 4 Ultra | Brightway | ✅ | Hypersniper_de |
| 4 Pro 2nd Gen | Brightway | ✅ | encryptize |
| 5 | Brightway | ✅ | holow_rt |
| 5 Max | Brightway | ✅ | Lenny5292 |
| 5 Pro | Brightway | ✅ | Krypz0n |
| 5 Elite | LEQI | ✅ | Turbojeet |
Note: If you own a model marked as TBA (To Be Announced), please be aware that the process hasn’t been fully tested yet. You can help by testing and reporting your results.
Safety Warning
Before proceeding, please understand:
- Warranty: This process will void your scooter’s warranty
- Safety: Incorrect modifications could affect your scooter’s safety
- Legal: Ensure your modifications comply with local laws
- Risk: You are responsible for any damage or issues that may occur
Important: This guide is provided solely for educational and research purposes. We do not endorse, recommend, or support any commercial activities related to scooter modification, including but not limited to: complete flashing kits, tuning services, modification services, or any other commercial products or services. Any modifications made to a scooter are done at the user’s own risk and responsibility.
For complete legal information, please read the Full Disclaimer at the bottom of this guide.
Warning About Tuning Chips
Some sellers offer “tuning chips” or “plug-and-play speed modules” that claim to unlock higher speeds on your scooter. We strongly advise against using these devices for several important reasons:
Safety Risks
- Uncontrolled Modifications: These chips often make arbitrary changes to motor parameters without proper validation
- Throttle Problems: Can interfere with throttle control
- Braking Problems: Can interfere with regenerative braking systems
- Bad Respose Time: The chips introduce delay and will lead to both a delay in the control response and displayed values
Technical Problems
- Unknown Quality: No quality control or safety standards for these devices
- Permanent Damage: Can cause irreversible damage to your scooter’s electronics
- Reliability Issues: May work initially but cause problems over time
- No Support: Usually no warranty or technical support available
Why Proper Firmware Is Better
- Controlled Changes: Modifications are made with understanding of the system
- Reversible: Can be reverted to stock firmware if needed
- Community Tested: Changes are tested by the community
- Transparent: You know exactly what modifications are being made
Important: Any device claiming to increase speed through a simple plug-in module should be treated with extreme skepticism. These devices often work by sending false signals to the controller, which can lead to dangerous operating conditions.
Hardware Requirements
Step 1: Check Your Scooter’s Connector Type
First, look at the table below to find your scooter model and its required connector type:
All connectors have 5 pins. You need to match your scooter’s connector type exactly.
| Model | Required Connector | Size | Notes |
|---|---|---|---|
| 3 Lite | Male | M7 | |
| 4 | Male | M7 | |
| 4 Lite | Male | M7 | |
| 4 Lite 2nd Gen | Male | M8 | |
| 4 Ultra | Male | M7 | |
| 4 Pro 2nd Gen | Female | M7 | |
| 5 | Female | M7 | Models manufactured in 2025 may use M6! |
| 5 Max | Male | M7 | |
| 5 Pro | Male | M7 | |
| 5 Elite | Male | M8 |
What’s the difference?
- Male connector: Has pins that stick out
- Female connector: Has holes that the pins go into
Step 2: Get the Required Parts
You’ll need these three main components:
1. Dashboard Cable
This is the cable that connects your scooter to the computer. You have two options:
Option A: Buy a Complete Cable Assembly (Recommended for Beginners)
- This is the easiest option
- The cable should come with:
- M7/M8 5-pin Julet connector (depending on scooter model)
- Pre-attached DuPont headers
- Proper wire colors and pinout documentation
- No soldering or special tools required
- Look for these specifications:
- M7/M8 size (depending on scooter model)
- 5-pin configuration
- Correct connector type (male/female)
- Clear pinout documentation
- Examples (for reference only):
- M7 Female connector: M7 5-pin Julet Female Dashboard Cable
- M7 Male connector: M7 5-pin Julet Male Dashboard Cable
- M8 Male connector: M8 5-pin Julet Male Dashboard Cable
Note: These links are provided as examples of the type of product to look for. We do not endorse these specific sellers or products. Always verify specifications and seller reputation before purchasing.
Option B: Make Your Own Cable (For Advanced Users)
- Requires soldering or crimping skills
- You’ll need to source:
- M7/M8 5-pin Julet connector
- Appropriate gauge wires
- DuPont headers
- Tools needed:
- Soldering iron (30-40W) or crimping tool
- Lead-free solder
- Heat shrink tubing
- Wire strippers
- Multimeter for testing
Important: The dashboard connector is very small and delicate. Making your own cable is challenging and risky. We recommend using a complete cable assembly unless you have experience with electronics.
2. USB-to-Serial Adapter
This is the device that connects your cable to your computer. Look for these specifications:
- USB to TTL/Serial conversion
- 3.3V or 5V operation, must be set to 5V
- Tested chipset options include:
- CH340
- FT232RL
- CP2102
- Should have either:
- Pre-attached cable, or
- Pin headers for DuPont connections
Note: These adapters typically look like small USB sticks with pins or a cable attached.
3. DuPont Wires
You’ll need these if:
- You have a LEQI device (to bridge the connection)
- AND/OR, You want to extend the cable length from USB adapter to dashboard cable for more comfort
Specifications to look for:
- Female-to-female DuPont wires
- Length: 40-80cm
- Can be extended with male-to-female sets if needed
Step 3: Connect Everything
The dashboard cable has 5 wires that need to be connected correctly. The pinout varies depending on the connector size, which correlates with the scooter’s manufacturer.
Steps:
- Connect DuPont wires between the dashboard cable and adapter
- Make sure to match the pinout correctly (see below)
Important: Wire colors might be different on your cable. Always check the pinout with a multimeter if unsure.
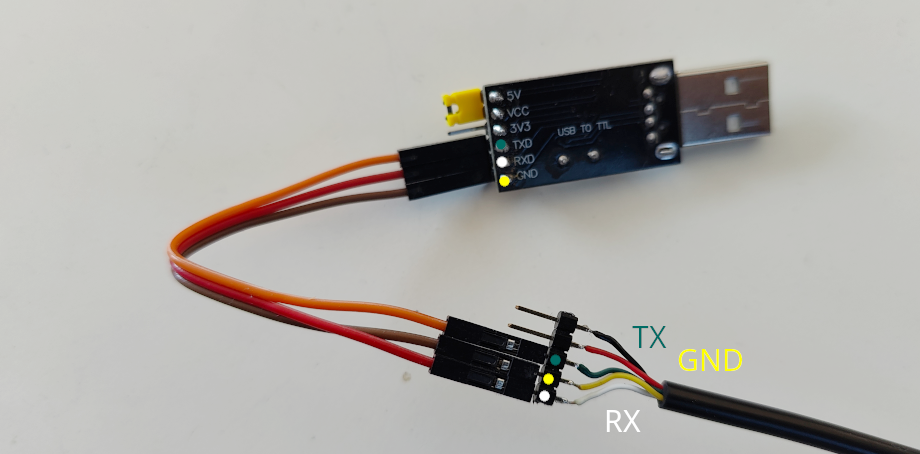
M7 cable (Brightway models)
| Wire Color | Purpose |
|---|---|
| White | RX (Receive) |
| Yellow | GND (Ground) |
| Green | TX (Transmit) |
| Red | 5V (Power) |
| Black | BTN (Button) |
Use three DuPont wires to connect GND, RX and TX of the dashboard cable with the adapter. To power on the scooter (trigger) in case it shuts down, you can bridge the BTN pin to the 5V pin momentarily.
Important: Make sure your UART adapter is set to 5V.
Connection example of UART adapter with DuPont wires:
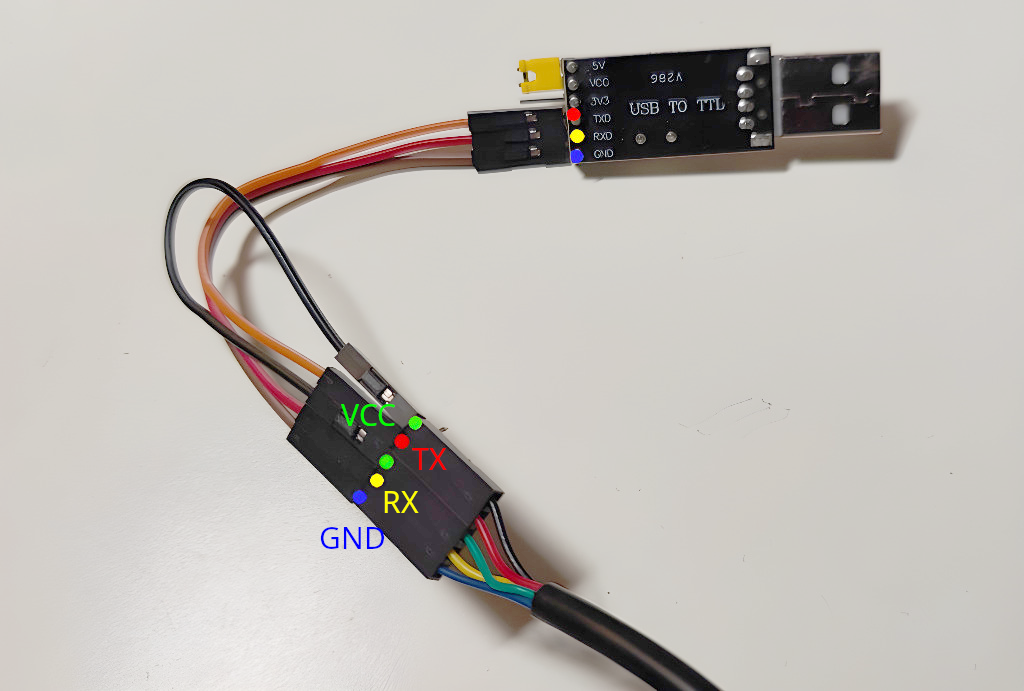
M8 cable (LEQI models)
| Wire Color | Purpose |
|---|---|
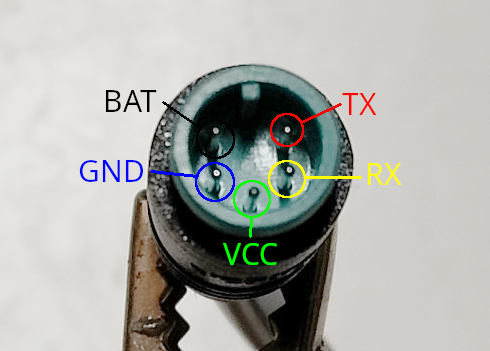
| Blue | GND (Ground) |
| Yellow | RX (Receive) |
| Green | VCC (~38V) |
| Red | TX (Transmit) |
| Black | BAT (~38V) |
Note: The controller is only powered on as long as the BAT line (38V) is bridged to the VCC pin! It needs to be bridged all the time during the process to keep the scooter on.
Use three DuPont wires to connect GND, RX and TX of the dashboard cable with the adapter. Use a fourth DuPont wire to bridge the BAT pin to the VCC pin. Be extremely careful to match the pinout correctly, otherwise you might brick your USB adapter or worst case your scooter.
Important: Make sure your UART adapter is set to 5V.
Connection example of UART adapter with DuPont wires:
Flashing Instructions
Step 1: Prepare Your Hardware
- Make sure your USB adapter is set to 5V
- Connect the dashboard cable to your USB adapter
- Connect your USB adapter to your computer
- Note the COM port number (see Finding COM Port)
Step 2: Get the Software
- Download BwFlasher
- Download your scooter’s firmware:
- Visit mi-fw-info
- Download the MCU firmware for your model
- Patch the firmware:
- Go to bw-patcher
- Upload your firmware
- Select your model and patches
- Download the patched firmware
Step 3: Flash Your Scooter
- Open BwFlasher
- Select your COM port
- Choose your patched firmware file
- Prepare your scooter:
- Remove handlebar screws
- Pull out the handlebar shaft
- Turn ON the scooter
- Unplug the dashboard cable
- Connect your adapter cable
- Click “Start Update” in BwFlasher
- Wait for “Flashing complete” message
Step 4: Reassemble
- Remove adapter cable
- Reconnect dashboard cable
- Reinsert handlebar shaft
- Tighten screws
Troubleshooting
Common Issues and Solutions
| Problem | Solution |
|---|---|
| Invalid Firmware File | Download the correct MCU firmware from mi-fw-info |
| Progress stuck at 5% or 45% | Try a different USB port or use a USB hub |
| Progress stuck at 0% | Try the steps listed below in order |
Steps to Fix “Progress stuck at 0%”
- Restart BwFlasher and retry flashing
- Make sure scooter is ON when starting update
- Make sure have the latest driver installed for your USB adapter
- Connect cables in this order:
- Connect USB adapter to PC
- Turn ON scooter
- Disconnect scooter cables
- Connect USB adapter cable to scooter
- Check all cable connections are secure
Additional Resources
Dashboard Cable Pinout
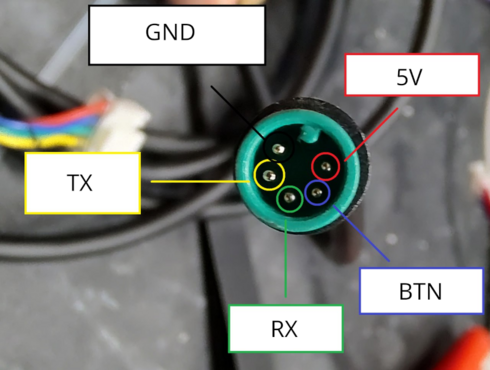
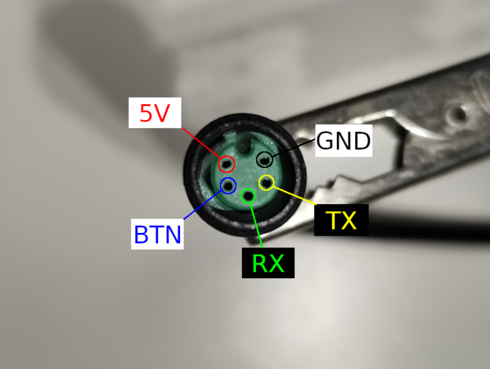
Male and female connector pinouts are mirror images of each other - what appears on the left side of the male connector corresponds to the right side of the female connector, as this is how they physically mate together.
M7 Connector (Brightway)
Male:
Female:
M8 Connector (LEQI)
Male:
Finding COM Port
On Windows:
- Open Device Manager
- Look under “Ports (COM & LPT)”
- Your USB adapter should appear with a COM port number
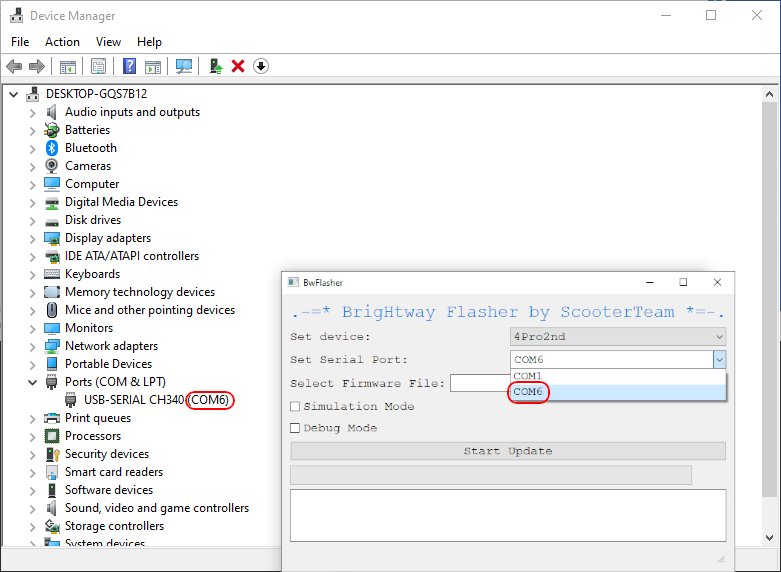
Note: If you don’t see your adapter, you may need to install drivers for your specific USB adapter model.
Advanced Connection Methods
If you need to create a custom connection, consider these alternatives:
- Using a JST Connector:
- Use a regular 5-pin JST connector (like a spare hall sensor cable)
- Requires careful pin matching
- More forgiving than direct wiring
- Pin Replacement Method:
- Pull out and replace pins in the original connector
- Requires precision tools
- Preserves original connector housing
- Sewing Needle Method:
- Use sewing needles as temporary connectors
- Requires careful handling
- Good for testing before permanent solution
Warning: These methods are for advanced users only. They require careful handling and proper tools to avoid short circuits and damage.
For a detailed tutorial on custom connector methods, you can watch this custom connector tutorial.
Full Disclaimer
This guide is provided with the following important notices:
-
Educational Purposes Only: This guide is provided solely for educational and research purposes. The information contained herein is meant to help understand the technical aspects of scooter systems and should not be used to modify or alter any scooter’s functionality.
-
No Endorsement: This guide does not endorse, promote, or encourage the modification of scooter firmware or hardware. Any modifications made to a scooter are done at the user’s own risk and responsibility.
-
Warranty Voidance: Any modifications to the scooter’s firmware or hardware will void the manufacturer’s warranty. Users should carefully review their warranty terms and consider the implications before proceeding.
- Legal Compliance: Users must ensure compliance with all applicable laws and regulations in their jurisdiction, including but not limited to:
- Vehicle modification laws
- Speed limit regulations
- Road safety requirements
- Intellectual property laws
- Local transportation regulations
- Safety Risks: Modifying scooter firmware or hardware can create serious safety hazards, including:
- Compromised braking systems
- Unstable handling
- Electrical system failures
- Fire hazards
- Personal injury risks
- No Liability: The creators of this guide:
- Make no warranties about the accuracy or completeness of the information
- Are not responsible for any damages or injuries that may result from using this information
- Do not provide technical support or assistance with modifications
- Cannot be held liable for any direct, indirect, incidental, or consequential damages
- User Responsibility: By using this guide, users acknowledge that they:
- Understand and accept all risks involved
- Are solely responsible for their actions and their consequences
- Will not hold the guide creators liable for any issues
- Will comply with all applicable laws and regulations
- Will ensure the safety of themselves and others
This guide is provided “as is” without any express or implied warranties. Users proceed at their own risk and discretion.